Oh, my dears, gather ’round! Grandma Rose has a treat that’s just perfect for little goblins and ghouls – and the young at heart, of course! We’re making Halloween Chocolate Covered Strawberries, a simple joy that’s as fun to create as it is to devour. These aren’t just any chocolate-dipped berries; they’re little edible masterpieces that scream ‘Halloween’ with every bite. And don’t you worry, even if you’ve never dipped a strawberry in your life, I’ll guide you every step of the way. It’s easier than you think, darling!
The best part? This recipe is perfect for getting the little ones involved. Imagine their faces lighting up as they add candy eyes or crushed cookie ‘dirt’ to their spooky creations. It’s about making memories, sweet memories that will last long after the last strawberry is gone. So, let’s put on our aprons, get our hands a little messy, and create some Halloween magic, shall we?
Why You’ll Love These Halloween Chocolate Covered Strawberries
Now, you might be thinking, ‘Grandma Rose, why should I make these instead of buying them?’ Well, let me tell you, there’s a world of difference between store-bought and homemade, especially when it comes to love. But besides that, here are a few more reasons why you’ll absolutely adore these Halloween treats:
- Perfect Easy Treat: They’re incredibly simple and quick to make, even for beginner bakers.
- Spooky Halloween Fun: They’re festive and add a touch of whimsy to any Halloween gathering.
- For Kids and Adults Alike: Everyone loves chocolate-covered strawberries, no matter their age!
- Customizable: You can decorate them with your favorite Halloween candies and colors.
- Made with Love: Nothing beats a homemade treat made with care and attention.
Ingredients for Spooky Strawberry Fun
Here’s what you’ll need to create these delightful Halloween Chocolate Covered Strawberries. Don’t be intimidated; it’s a short and sweet list!
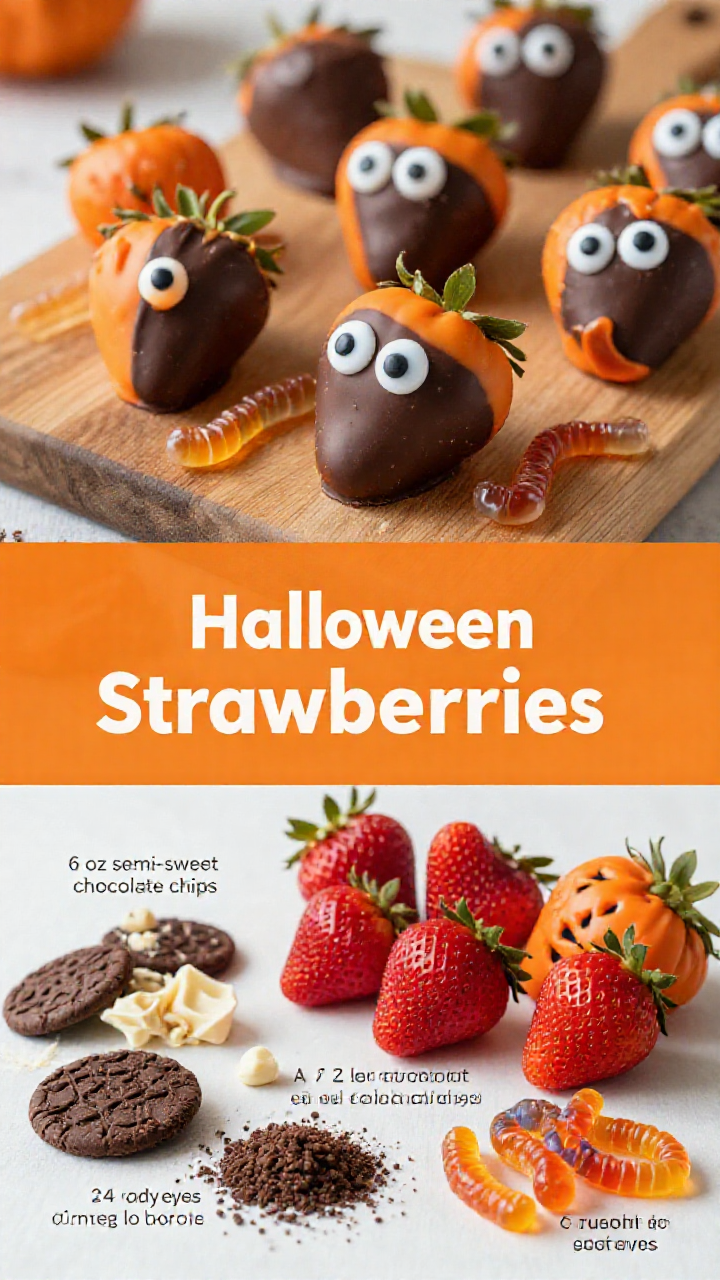
- 6 oz semi-sweet chocolate chips
- 6 oz white chocolate chips
- 24 large strawberries
- A few drops of orange gel food coloring (optional)
- Optional: candy eyes, crushed chocolate cookies, gummy worms, etc.
Let’s Make Some Magic: Step-by-Step Instructions
Alright, my little pumpkins, let’s get started! Follow these simple steps, and you’ll have a batch of spooky and sweet Halloween Chocolate Covered Strawberries in no time.
- Prepare the Strawberries: Gently wash the strawberries and pat them completely dry with a paper towel. This is very important; any moisture will prevent the chocolate from sticking properly.
- Melt the Chocolate: In separate microwave-safe bowls, melt the semi-sweet and white chocolate chips. Microwave in 30-second intervals, stirring in between, until smooth. Be careful not to overheat the chocolate, or it will seize up.
- Add Color (Optional): If you’re using orange food coloring, add a few drops to the melted white chocolate and stir until you achieve your desired shade. Remember, a little goes a long way!
- Dip the Strawberries: Hold a strawberry by the stem or leaves, and dip it into the melted chocolate, swirling to coat evenly. Lift the strawberry and gently tap off any excess chocolate.
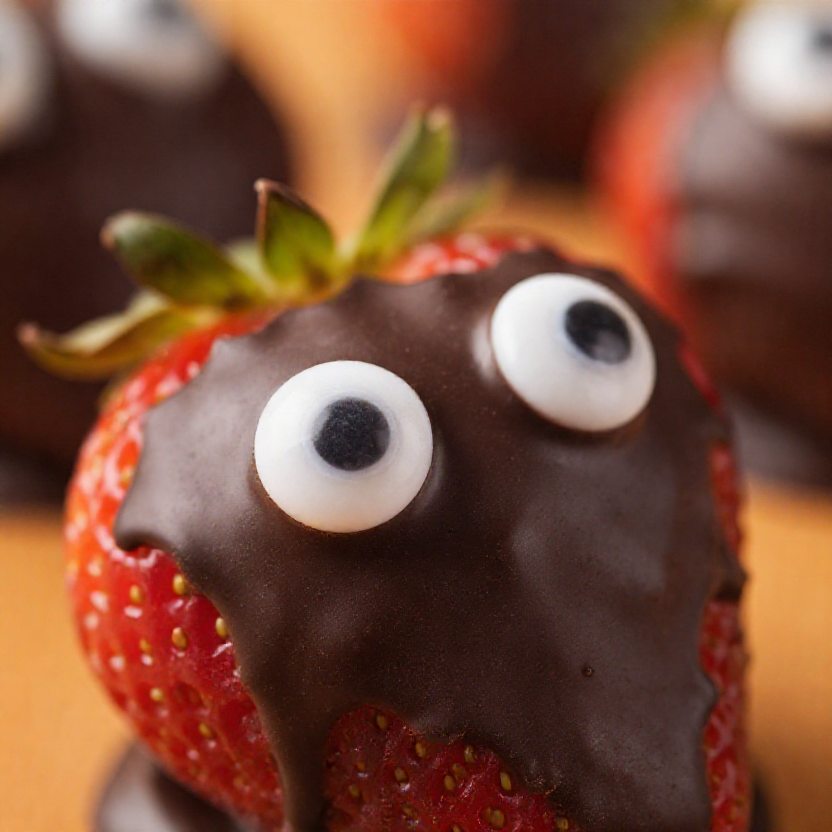
- Decorate: While the chocolate is still wet, decorate the strawberries with candy eyes, crushed chocolate cookies, gummy worms, or any other Halloween-themed candies you desire. Get creative and have fun!
- Set the Chocolate: Place the decorated strawberries on a parchment-lined baking sheet and refrigerate for about 15-20 minutes, or until the chocolate is set.
Pro Tips for Perfect Chocolate Covered Strawberries
Now, here are a few little secrets to ensure your Halloween Chocolate Covered Strawberries turn out absolutely perfect, just like I remember making with my own grandchildren:
- Dry Strawberries are Key: I can’t stress this enough! Make sure your strawberries are completely dry before dipping them. Water and melted chocolate don’t mix, darling.
- Use Good Quality Chocolate: The better the chocolate, the better the taste. Splurge a little; it’s worth it.
- Melt Chocolate Slowly: Be patient when melting the chocolate. Low and slow is the way to go to prevent burning or seizing.
- Work Quickly: Chocolate sets fast, so have your decorations ready to go before you start dipping.
- Chill Time is Important: Don’t skip the chilling step; it helps the chocolate set properly and prevents it from melting at room temperature.
Common Mistakes to Avoid
Even the best bakers make mistakes sometimes, but don’t you fret! Here are a few common pitfalls to watch out for:
- Wet Strawberries: As I mentioned before, moisture is the enemy.
- Overheated Chocolate: Burnt chocolate is no good. Microwave in short intervals and stir frequently.
- Too Thick Chocolate: If the chocolate is too thick, it will be difficult to dip the strawberries evenly. You can add a teaspoon of vegetable oil or shortening to thin it out.
- Rushing the Process: Take your time and enjoy the process. Baking should be relaxing and fun!
Variations: Spooky Creations Galore!
The beauty of this recipe is that you can customize it to your heart’s content. Here are a few fun variations to try:
- White Chocolate Ghosts: Dip the strawberries in white chocolate and use mini chocolate chips for eyes to create adorable little ghosts. The strawberries are the perfect canvas for you can make these into ghosts.
- Spiderweb Strawberries: Dip the strawberries in semi-sweet chocolate, then drizzle melted white chocolate over the top and use a toothpick to create a spiderweb design.
- Mummy Strawberries: Dip the strawberries in white chocolate and then use a piping bag filled with melted white chocolate to create mummy-like wrappings.
- Candy Corn Colors: Use yellow, orange, and white candy melts to create a candy corn effect on the strawberries. We then layer the colors to mimic candy corn.
- Crushed Candy Toppings: Roll the dipped strawberries in crushed Halloween candies like candy corn, peanut butter cups, or gummy worms.
Storing Your Halloween Treats
If you have any leftover Halloween Chocolate Covered Strawberries (though I doubt you will!), here’s how to store them:
- Refrigerate: Store the strawberries in an airtight container in the refrigerator for up to 2 days.
- Best Eaten Fresh: They are best enjoyed within the first 24 hours, as the strawberries may start to release moisture over time.
Frequently Asked Questions (FAQ)
Here are some common questions I get asked about making chocolate-covered strawberries:
- Can I use frozen strawberries?: I don’t recommend it, darling. Frozen strawberries tend to be too watery and won’t hold the chocolate well.
- Can I use candy melts instead of chocolate chips?: Absolutely! Candy melts are a great option for adding vibrant colors.
- My chocolate is seizing up. What do I do?: Add a teaspoon of vegetable oil or shortening to the chocolate and stir until smooth.
- How do I prevent the chocolate from cracking?: Make sure the strawberries are completely dry and don’t refrigerate them for too long.
- Can I make these ahead of time?: Yes, you can make them a day in advance, but they are best enjoyed fresh.
Serving Suggestions: Share the Spooky Love!
These Halloween Chocolate Covered Strawberries are perfect for:
- Halloween Parties: A festive and delicious addition to any Halloween spread.
- Gifting: Package them in a cute box or bag for a sweet and spooky gift.
- Dessert: A simple and satisfying dessert after a Halloween dinner.
- Snacking: Enjoy them as a fun and festive snack any time of day.
So there you have it, my dears! A simple, spooky, and oh-so-sweet treat that’s sure to be a hit with everyone. Remember, the secret is patience and a whole lot of love. Now go on and create some Halloween magic in your kitchen! And don’t forget to share, because baking is always better when it’s shared with loved ones. Happy Halloween, darlings! These halloween strawberries are the perfect treat for the season! Make these a tradition, just like I did with my family. You can make them every year!

Halloween Strawberries
Ingredients
Notes